- Theme Packs
- Themes
-
Preschool Planning
- Preschool Teachers

Mad Preschool Science Theme
A Mad Preschool Science Theme that is all about.....yup--mad, crazy science! A big, huge THANK YOU to Jessica M.B.--one of your "cyber-colleagues"!
This theme was her suggestion and you will find several of her submitted activities here!
This page includes preschool lesson plans, activities and Interest Learning Center ideas for your Preschool Classroom!
You'll find more themes to help you with your planning on my preschool themes page.
Learn more about Preschool Science Process skills AND earn in-service hours!
Read more by clicking here or the picture below!If you have more crazy science ideas you think should be added, click here to Contact Me! Please be sure to tell me that it is for the Mad Science Page!
Let the Mad Preschool Science Theme planning begin!
You can either scroll down through this page to see all of the preschool activities for your theme or click the link below to go to specific Mad Preschool Science activity types you are looking for.
This Mad Preschool Science theme may make you wonder what basic items you should have in a Science Interest Center? Wondering what children learn by participating in science activities? Well, wonder no more! Click here to read my Science Interest Center page article!
Mad Preschool Science Theme Art
Clean Paint!
Materials Needed: 1/3 cup baby shampoo, 1 tablespoon cornstarch, food coloring of different colors, bowls (or use a muffin tin!), paper, cotton swabs (Q-Tips)
Mix the shampoo and cornstarch. Add in a few drops of food coloring. Mix.
The children paint using cotton swabs onto the paper. You COULD also paint right onto the tables!!
Chalk Paint
Materials needed: 1/4 cup water, 1/4 cup corn starch, food coloring
Mix food coloring into the water. Add to the cornstarch and mix. This is great paint for paper or for the sidewalk outside!
Mad Preschool Science 3-D Sand Painting
Materials needed: 1/3 cup flour, 1/3 cup salt, 1/3 cup water, 1/2 tablespoon of sand, tempura paint, empty/cleaned plastic squeeze bottles, cardboard or tag board
Have children help you to measure the dry ingredients into a bowl.
Mix the Water with 3 tablespoons of paint.
Add water mix to the dry ingredients and mix.
Put in squeeze plastic bottles (dish detergent bottles, condiment bottles, salad dressing bottles)
The children squeeze onto their cardboard or tag board. Let dry 24 hours.
Mad Preschool Science Color Art!
Materials needed: coffee filters or sheets of absorbent paper towels, fat markers, spray bottles filled with water (or pipettes and water)
The children color on the filters or towels with markers.
They then use the spray bottle or pipettes and water to wet the paper. The colors spread and are awesome looking!
Here is a video of this process in action with my multi-age group!
Bubble Painting
Materials needed: bubble solution, paint, straws (with a notch cut just below where the children will hold the straw), paper
Pour solution in many cups that are not too deep (plastic paint cups work well). Fill about 3/4 full.
Add paint to color.
The children choose a cup color and place it on top of their paper.
They blow into the cup with the straws, blowing until the bubble solution overflows the cups and drops onto their paper.
Encourage them to use many colors!
The small notch you cut out of the straw will prevent the children from being able to suck in the solution.
Now It's Clear! Mad Preschool Science Transparent Pictures.
Materials needed: white construction paper, crayons, vegetable oil and cotton balls.
The children color any picture or design they want. Be sure they use those muscles and press down hard!
When done, flip paper over.
Dip cotton balls into oil and brush entire paper.
Let dry. The paper will be transparent and the colors will be very brilliant!
Mad Preschool Science Theme Block Center Ideas
That's Mad Preschool Science Crazy!
Materials needed: Add PVC piping (elbows and straight pieces--these may be donated by your local home improvement store--ask! If you don't ask, the answer is always NO!), paper towel tubes (cut into various sizes), wrapping paper tubes and large marbles or small balls (like bouncy balls).
The children will not need any instruction! Just observe what they come up with while learning about physics and gravity with these materials!
Mad Preschool Science Theme Circle Time Ideas
Circle Time is such a great time for children to learn the social skills of being together as a large group AND to learn more about your theme!
Use your circle time for lots of discussion and for this theme, perhaps give them each "scientist" goggles to wear while learning at circle time!
It's a Mad, Mad....Swirl of Mad Preschool Science!
Materials needed: shallow bowl (lunch plate works well!), food coloring of different colors, dish soap and milk (go for whole milk..the fattier the better for this...anything 2 % or higher will work..NOT skim milk!)
- Pour milk into the plate (about half full).
- Tell the kids they are going to add food coloring. Ask what they think will happen. Accept answers.
- Let each child choose a color and put one drop in!
- Tell the children you are going to now add dish soap. Ask what they think will happen.
- Be sure all the kids have a good view of the plate before doing this! It is so awesome!
- Drop a few drops of dish soap and the middle and watch!
The colors spread in beautiful patterns. The soap creates a reaction to the fat in the milk.
Check the process out here!
Lava Lamps Thank you Jessica M.B for this activity!
Materials needed: clear, plastic water bottles with lids, vegetable oil, food coloring, water, Alka-Seltzer tables, flashlight,
Because you are using medicine (Alka-Seltzer), be sure to completely supervise this activity
1. Fill the bottle 3/4 full with vegetable oil.
2. Fill the rest of the bottle with water (almost to the top but not overflowing).
3. Add about 10 drops of food coloring. Be sure to make the water fairly dark in color. Notice that the food coloring only colors the water and not the oil. Hmmm...
4. Divide the Alka-Seltzer tablet into 8 pieces.
5. Drop one of the tiny pieces of Alka-Seltzer into the oil and water mixture. Watch what happens. When the bubbling stops, add another chunk of Alka-Seltzer. It’s just like a lava lamp!
6. If you want to make it even more "lava-like," put your bottle on a flashlight and turn the room lights off.
7. When you have used up all of the Alka-Seltzer and the bubbling has completely stopped, screw on the bottle cap.
Tip the bottle back and forth and watch a wave appear. The tiny droplets of liquid join together to make one big lava-like blob.
EXTENSION: Have materials to make one of these with each child at your science interest center.
How EGGciting!
Materials needed: raw eggs, hard boiled eggs, cups or bowls.
Crack open a raw egg into a cup. Talk about eggs with the children!
Peel a hard boiled egg and place in a cup. Talk about it with the children.
On a flat surface, spin a raw egg and a hard boiled egg at the same time.
Talk to the children about how they spin. Do they spin the same? Different?
What's happening: The raw egg has fluid that moves around when spinning. This makes the egg spin unevenly.
The hard boiled egg is now a solid and its contents are spread evenly so it can spin evenly and faster (insides are not moving!).
EXTENSION: Spin both eggs again and this time gently touch them to stop them from spinning and remove your finger. The raw egg will wiggle or wobble because the insides are still moving!
That's a STRONG egg!
Materials needed: raw eggs, big bucket!
PRACTICE THIS AT HOME FIRST!
Ask the kids if they think you can squish the egg in your hand!
Hold your hand over the bucket and hold an egg.
Close your fingers around the egg and squeeze as hard as you can...it should not break!
What's happening? The pressure you add to the egg is spread over the entire surface of the eggshell so it doesn't break, whereas cracking one just puts pressure in one area of the egg.
Snack Recipe Ideas for Your Mad Preschool Science Theme!
Cooking with children helps develop their math skills and helps them to learn how to follow directions. It also allows for some great conversation! Ask many questions while cooking with your children to encourage conversation! Be sure to ask specific themed questions while making these fun snacks!
Banana Ice Cream, without the cream?!Materials needed: blender, bananas, plastic knives
Have the children help you cut the bananas into chunks. Keep the bananas peeled, just cut them!
Place them in the freezer.
Later in the day, or the next day, take them out of the freezer.
Have the children help peel the chunks. (This may take a few minutes...they are cold and the skins are stuck on! Perhaps let sit at room temp for a few minutes before they try to peel.
Add one teaspoon of water for every banana in the blender.
Blend and eat! The texture is just like ice cream! Really yummy!
Home Made ButterMaterials needed: small, glass jars (baby food jars), a pint of heavy whipping cream, pinch of salt, a stick of butter or small tub of butter (just to observe), plastic knife, crackers
I would suggest making this in small groups. It takes 4 or 5 minutes of shaking and most kids won't shake the jars that long or that hard on their own, but as a small group, they will do great!
Show the children the stick or tub of butter. Ask if they know what it is. Ask them where they think it comes from? What is it made of?
Have them help you pour some whipping cream into a glass jar. Add a pinch of salt for flavor. Cover tightly.
Tell them that cream is used to make butter and they are going to make some together!
Demonstrate shaking the jar, counting to 10.
Then pass it from child to child as they shake and count to 10.
Do this until the cream has turned thick! You will have to pour out the extra fluid.
Be sure to open the jar and look after you have shaken it for a while. If it is a clear jar, it will look watery because there is excess water that does not mix into the butter, but the rest will be a solid.
Serve with crackers!
Mad Preschool Science Theme Ideas to Transform Your Dramatic Play Area
Mad Preschool Science Lab!
Turn your dramatic play area into a Science Lab. Have bins or tables available with these activities that are child directed--or add our own activities!
I HIGHLY recommend lab coats and plastic, safety goggles, just to make it official! (Adult, white button up shirts make great lab coats!).
Fix-It Area
Provide a flashlight. Take it apart so that the cover, body and batteries are on the table or in a bin. Let the children figure out how to put it back together so it works!
Evaporation Station
On a table, place black and dark blue paper. Provide large and small pieces of chalk and a shallow tray of water. The children draw with the wet chalk onto the paper. They watch as the water evaporates but the colors stay!
Rock and Roll!
Provide pipettes, water and a large selection of water. The children can sort, compare, observe the rocks as well as see how long it takes water to evaporate from rocks. The water also changes the color of rocks somewhat by making them appear darker when wet.
Investigation Station
Provide magnifying glasses and paper (to use as journals) with crayons and a collection of some sort.
Some suggestions:
Ocean items--sea shells, starfish, seaweed.
Buttons--all sorts and sizes
Polar Place
Nope, not a cold place...but polar opposites! Magnets!
Provide many different types of magnets: horseshoe shaped, magnet wands, large button magnets, etc. Also provide a wide variety of items to investigate the magnets with: paper clips, magnetic letters and numbers, pencils, etc.
EXTENSION: In advance, make magnet bottles to investigate as well. Try filling a clear, plastic water bottle (1 liter) with salt and lots of magnetic items. Shake. The children use the magnet wand to "find" items in the jar by moving the wand on the outside of the bottle.
Mad Preschool Science Theme Ideas for Your Easel--
More Than Just Painting (Although that is always THE favorite in our classroom!)Crazy Drips!
Provide a variety of colors of watered down paint and pipettes. Use finger paint paper on your easel.
Encourage the children to drip paint at the top of the paper and observe it drip down.
The more different colored drips they add, the more fun!
VARIATION: Provide small spray bottles with water colored with paint to spray onto the paper! Great muscle development and fun!
Mad Preschool Science Creation! Thank you Jessica M.B for this activity idea!In advance, glue on googly eyes to many papers.
The children choose a paper and paint a creature around the eyes! It may be a mad bug, person, monster, etc.!
Mad Preschool Science Theme Large Group Games
To Help Preschoolers Build Their Muscles While They Have Fun Together!Mad Preschool Science Pendulum Painting
Okay, bear with me here! This is AWESOME! One teacher I worked with years ago actually attached a pendulum to rope and hung that from the ceiling for the kids to use (with adult supervision!).
The one I'm suggesting here is on a much smaller and individual scale!
Materials needed: plastic funnels, string (not yarn), liquid starch, powdered tempera paint, bowl, large sheets of paper
Tie a piece of the string around the wide edge/lip of the funnel.
Now, tie three pieces of string (of equal lengths--about 12 inches each) to the string that is around the edge/lip of the funnel.
Tie the three ends of the string together. This is where the children will hold the pendulum from.
Mix liquid starch and powdered paint into a bowl. Pour it into the pendulum (the paint should come out evenly but not too fast).
Hold your finger over the hole of the funnel.
The child holds the pendulum from the strings over the paper. Tell them not to move their hand. You let go of the hole and push the pendulum.
Help the child hold their arm still as they watch the paint make designs.
VARIATION: Obviously, would be to let them move their hands/arms back and forth to make the pendulum move over the paper!
Heart Beat MovesMaterials needed: Working stethoscopes, a large space
Have children listen to their heartbeats. Have them find their pulse.
Now do some exercises: Jump 4 times, run in place, etc.
Check heart beat again! It's working!
Be sure to do warm up and cool down stretches...check heartbeat and/or pulse during these times as well.
Mad Preschool Scientist PathsCreate an obstacle course outside or in a large space. Scientists need to get exercise, too--not just spend all day in their laboratories!
Mad Preschool Science Ball/Marble Paths
Attach PVC piping, paper towel tubes and gift wrapping tubes outside with large marbles or balls that will fit in the tubes.
Encourage the children to find ways to get the marbles/balls from one side of the yard to the other using the tubes for them to travel in!
Mad Preschool Science Scavenger Hunt Thank you Jessica M.B. for this activity idea!Hide science items for the children to find.
Use items you have been using during this theme such as a balance scale, flashlight, goggles, lab coat, etc.
EXTENSION: Take pictures of the items and make color copies of the items. The children take a copy, a clipboard and a crayon and check off each item when they find it!
Duck, Duck, Mad Preschool Scientist!Play a variation of Duck, Duck, Goose. During this theme, say Scientist, Scientist, MAD SCIENTIST!
Mad Preschool Science Theme Ideas for Your Library
A Picture Says a 1,000 Mad Preschool Science Words
Find pictures of science themes, activities, etc. and hang them here and all around your room!
Book Suggestions for the Library
(I LOVE Amazon, and some of the links below will take you to the Amazon website. If you do choose to purchase yours through Amazon, they do send me a few cents--which supports my coffee habit! )
Ada Twist, Scientistby Andrea Beaty
Look I'm a Scientistby DK Children
It's Falling, Falling! (Science Storybooks: Gravity)by Ji-An Yang
Goodnight Lab(Like Goodnight Moon!!) by Chris Ferrie
Move It!: Motion, Forces and You (Primary Physical Science)by Adrienne Mason
I have a 4 clock hour workshop available called "Science in the Preschool Classroom". It covers the 7 science process skills preschoolers learn through science, how to set up science themes, science themed activities and more.
It may also qualify for in-service hours in your state!
Click here to learn more about it!Mad Preschool Science Theme Activities to Help Your Preschoolers Develop Their Math Skills AND the Small Muscles in Their Hands!
Your OWN Silly Putty!
I used to LOVE this stuff, especially using it on the Sunday newspaper comic strips! Here's how to make some with your preschoolers!
Materials needed: Plastic eggs (for storage of course!), liquid starch, white glue, food coloring, cups, craft sticks to mix with, tablespoons
- Children measure 2 tablespoons of glue into a cup.
- They add 3 drops of food coloring into the glue and mix with the craft stick.
- They measure 1 tablespoon of liquid starch into cup and mix.
- Remove from cup and knead, mix with hands.
- Store in plastic eggs.
This is a great manipulative to build up those muscles! Also, give them some newspapers to press the putty onto and when they remove it, they will see a mirror image of what they pressed it onto!
Make Your Own Crayons
Materials needed: muffin tins, crayon pieces (paper peeled off). Peeling the paper off the crayons is a GREAT small/fine motor activity for the kids to do! I recommend pre-slicing the outer paper with an exacto-type knife first to help the children get the paper peeling started. If not, they will become frustrated trying to get the peel started using their fingernails.
The children place the colors they want in one section of the muffin tin. Fill with crayon pieces to about 2/3 full.
Place in preheated 250 degree F oven for about 3-5 minutes, or until crayons are melted.
Remove from oven. Cool. Remove and use!
Mad Preschool Science Packing Peanut Sculptures
Did you know that most packing peanuts are now made of corn starch and water? This is because of prior choking hazards for children. You can test yours by dipping them in water...do they melt a bit? If not, they are plastic. Do not use these...they will not work!
You can purchase them in teacher supply stores or stores like Target (they can be purchased colored!).
Provide packing peanuts, shallow trays of water and cardboard or tag board.
The children dip the peanuts into the water and stick to other packing peanuts to make great sculptures!
If you are using white packing peanuts, have an activity on a different day where the kids color them with markers!
Show Me The Money!Materials needed: Old pennies (dirty ones!), table salt, white vinegar, cups, spoons, baby wipes.
First, have your scientists clean their pennies using baby wipes. Ask questions: Are your pennies getting clean? Why or why not?
Then, each child puts about a 1/4 cup vinegar and 1 tablespoon of salt in a cup.
Add pennies.
Stir for about 2 minutes.
Remove pennies. Now wipe clean with wipes! Wow! Shiny!
Mad Preschool Science Playdough Creatures Thank you Jessica M.B. for submitting this activity idea!Materials needed: Playdough (preferably your favorite recipe that you make WITH the kids!), scraps of collage materials, toothpicks, craft sticks, etc.
The children make their own Mad Preschool Science bug, creature, monster, person, etc.
Mad Preschool Science Theme Music & Movement Activities to Get Your Preschoolers Movin' and Groovin'!
Sound Glasses--Just Musical but Mad Preschool Science!
Materials needed: 6-8 glasses (same size), water, food coloring, pencil or metal spoon
Have the children help pour different amounts of water in the glasses.
Add different colors of food coloring to each glass.
Demonstrate the different sounds each glass makes.
Let them play!
EXTENSION: Suggest "patterns" for the children to play: Red glass, red glass, green glass, red glass, red glass, green glass!
EXTENSION: I am by NO stretch of the imagination musical! I actually encourage the children to sing louder than me to drown me out because, well, NOBODY wants to hear me sing! ;) But, I digress! If you, or someone you know IS musical, ask them to help measure enough water in each glass so that it represents an actual musical note and then play some songs!
Everyday Musical Instruments
Provide a variety of everyday objects that can be made into instruments by your scientists. Suggestions:
Tin pie plates, blocks of different colors and sizes, metal cans (with the edges taped for safety), wooden and metal spoons, pots and pans, boxes, pencils (to use for drum sticks), coffee cans with covers, etc.
Don't tell your kids how to use them.......they already know!
Bubble Wrap DancingMaterials needed: lots of bubble wrap, CD player with fun music
Before dancing, sit with the children and give them each a piece of bubble wrap. Yes, they will pop them...of course! Join in the fun. Ask them what they think makes the noises? What are in the bubbles? Etc.
Then, let the children dance like mad on the bubble wrap while the music plays!
EXTENSION: Play freeze dance! They need to freeze...like a frozen bubble...when the music stops and not dance again until the music starts.
EXTENSION: Have a variety of tempos of music to dance to--fast, slow (jazz, rock, etc.).
Mad Preschool Science Musical Egg Investigating and Making!Materials needed: An actual music egg, Plastic eggs, clear packing tape, variety of seeds, beans, rice, jingle bells, paper clips, etc.
Let the children check out the music egg. Ask them to discuss what it is made of, what is in it, etc.
Now, tell them they are going to make their own.
Provide the materials in different bowls.
Let the kids investigate the types of sounds each item makes in a plastic egg of their own.
Let them try adding several items to their egg!
When they are satisfied with the sound of their egg--tape them up with clear packing tape, write their name (using a permanent marker) and dance away!
Use the eggs to identify colors, counting, following directions etc:
Anyone with a blue or green egg--shake!
Everyone shake your eggs 7 times.
Shake your egg 3 times and then turn around.
Mad Preschool Science Theme Activities for Your Sand and Water Table!
Soap Blob!
This is so cool! You take a bar of Ivory Soap (do NOT use any other kind of soap--it will burn!) and put it on a plate in the microwave!
Show the children a bar of Ivory soap, pass it around, touch it, smell it, talk about what it might be made of or used for!
Then microwave it!
Let the kids manipulate and try to sculpt with it!
It is the most awesome blob I have ever seen! Here is a video of the very first time I made it!
Mad Preschool Science Moon Sand
You can purchase this in a teacher or science store or at some Target Stores, but why not make your own?!
Have the children help you to measure the following ingredients into your sand table and mix with their hands (or make it in a bin and pour into your sand table).
Add plastic planets and sand molds for fun!
Mix 8 cups of flour and 1 cup of baby oil. Yup, that's it! You could add food coloring to the baby oil first to color your sand!
7 Layer Density JarThese are so cool! You will need the following to make and have available for the kids:
Clear, plastic cups ( 9 ounce size)
honey
light Karo syrup
Dawn dish soap (the blue one)
water
vegetable oil
rubbing alcohol
lamp oil
food baster
Tall, clear beaker (called graduated beakers)
Measure 8 ounces of each liquid and put into its own 9 ounce clear, plastic cup
Let the kids check out the cups (except for the rubbing alcohol and lamp oil--they should NOT touch these 2).
Color some of the liquids so that you can see each one (color the Karo syrup, water, lamp oil, rubbing alcohol)
Pour the liquids into the beaker in the order listed above.
Pour each liquid in very slowly......use the food baster for the first few liquids after the honey so that it slowly layers on top of the previous liquid.
It is very cool how the liquids stay separate because of their densities and what they are made of.
Glow in the Dark Ooze/Slime for a Mad Preschool Scientist!
Materials needed: 2 bowls, 4 ounces of clear or blue Elmer's glue, 1 1/3 cups of warm water, 3 tablespoons glow in the dark paint, green neon food coloring, 2 teaspoons of Borax detergent,
In the first bowl, measure 1 cup of the warm water (leave the remaining 1/3 cup for a later step) with the glue and mix.
Stir in the neon food coloring and the glow in the dark paint.
In the other bowl, mix the remaining 1/3 cup of warm water with the Borax and stir until the Borax is completely dissolved.
You will not need all of this liquid mix. This is your Borax Solution. The more of this solution you add, the stiffer the ooze/slime will be!
Begin pouring the solution into the glue mixture, stirring continually. Add more food coloring as wanted and more solution if you want it runnier!
There is a picture of this on my Pinterest Page under Mad Science Theme.
Mad Preschool Science Goop!
Kids LOVE this and they can make it themselves, if you would let them!
You add 3/4 cups of cornstarch with 1/2 cup of water (you can add food coloring to the water before adding to the cornstarch. It is difficult to add color once it is mixed).
It is stiff in the bin, the pressure from holding it “melts” the mixture and it drips off and through their fingers! (The corn starch and water combination is a suspension--a non-Newtonian fluid--the texture/viscosity changes with force!
Try having different bins of different colors of goop!
Mad Preschool Science Theme.......Science!
For Your Preschool Scientists in Training!Mad Preschool Science Sculptures
Materials needed: plaster of Paris, water, Ziploc quart sized baggies, measuring cups
Have the children measure 1 cups of plaster of Paris and 1/2 cup water into their baggies.
Help them seal it quickly.
They knead the bags until mixed (remember, it sets pretty quickly).
Let bag sit once mixed.
When dry, remove from bag and let children paint their sculptures!
Yikes! Yeast Gas!
This is an experiment I have not yet tried, but was told is pretty cool (it was done in a Kindergarten classroom).
Materials needed: small bottle with skinny neck (like a glass soda bottle), balloon, package of yeast, 1 tablespoon of sugar, warm water
Put the sugar in the bottle (let children see, touch, smell the sugar. Talk about what it is used for and other information they might know about sugar!).
Pour warm water into the bottle so that it is about 1/3 full.
Put the package of dry yeast into the bottle and mix it up.
Stretch the opening of the balloon over the opening of the bottle.
Observe! The gas created by the yeast and sugar mixing will inflate the balloon...it takes about an hour so watch it over time.
Perhaps take a classroom observational check on it every 5-10 minutes and write down what the children observe!
Crazy and Mad Preschool Science Ice Balloons
Fill balloons with water and put in freezer.
Remove from freezer and peel balloons off.
Provide food coloring and pipettes to the kids to drip onto the balloons.
Leave in the bins and watch them throughout the day as they melt and the colors mix even more!
The best way to do this is to sprinkle some rock salt on the ice. This will melt the ice a bit and when the kids start dripping the colors on them, the colors will go on the outside and the inside of the sculptures!
There is a picture of this on my Pinterest Page under Mad Science Theme. See the Pinterest Link at the bottom of this page.
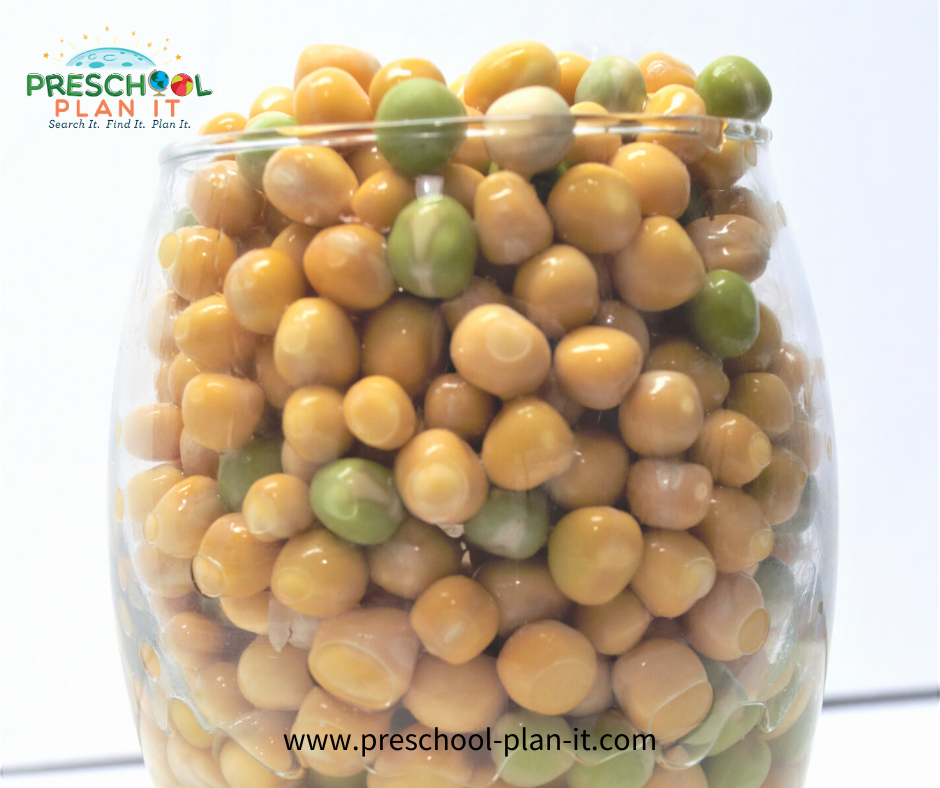
Mad Preschool Science Musical Peas
This is GREAT!
Materials needed: Wine glass (yes, a glass one!), a bag of dried peas, a metal cookie sheet
Place the wine glass on the cookie sheet.
Fill glass to the top with dried peas.
Now, fill the glass slowly with water, to the brim.
Just observe and listen for the change over the next hour or so. YOU will need to add water as the peas absorb the water over the next hour.
The peas will absorb the water and expand and will begin overflowing the glass!
SpEGGtacular Mad Preschool Science Time!
Have you ever made a rubber egg? This is fun to observe!
Place a raw egg into a clear jar. Fill jar with vinegar so that you cover the egg with it.
Let sit in jar. This can take from 24 to 48 hours to complete, so it is an "observational" activity!
Remove the egg and check it out!
The vinegar will almost immediately begin to break down the shell. Over the next day or so, it will dissolve the entire shell but the membrane of the egg keeps the insides intact an pretty rubbery!
VARIATION: I have never tried this, but was told that if you rub fluoride toothpaste on the egg before placing it int he vinegar, the shell won't dissolve! So, perhaps you could experiment with this and let me know if this is true!
Perhaps have 3 eggs: One in vinegar, one half coated with fluoride toothpaste and the third egg completely coated with fluoride toothpaste!
Writing Activity Ideas for Your Mad Preschool Science Theme!
Mad, Crazy Paint!
Mix equal amounts of baking soda and water and mix.
Provide children with white paper and cotton swabs (Q-Tips).
Encourage them to print their names, shapes, pictures, etc. on white paper using this "clear" liquid.
Set papers aside to dry.
In a muffin tin, place 1 tablespoon of water in each section. Add 6 drops of food coloring in each section (different color for each section).
Provide this colored water to the children with brushes to brush over their papers and their letters, names, etc. will show up!
My Name Is Growing!
Materials needed: potting soil, grass seed, pencil, shallow trays (one for each child)
Children fill tray with soil.
They use the pencil to print their name (help them if they need help).
Using their fingers, they place lots of seeds into the letters they just made.
Spray with water.
Spray daily, and within a few days, the grass will grow and spell their name!
Miscellaneous Activities for Your Mad Preschool Science Theme!
Mentos Geyser Thank you again to Jessica M.B. for submitting this activity!
With this project you can test out different sodas and brands if you like or just stick with one. I used diet coke. There are two ways you can do this. They sell a tool that you put the candy in and hook it to the soda bottle and has a release sting to pull then the candy falls in the bottle. And the magic happens. Or if you want to get messy you can put the candy in yourself but get ready for a soda shower.
Materials needed: Mentos, soda, And the tool if you wanted to get it cheap on eBay!
The science behind this is:
As you probably know, soda pop is basically sugar (or diet sweetener), flavoring, water, and preservatives. The thing that makes soda bubbly is invisible carbon dioxide gas, which is pumped into bottles at the bottling factory using tons of pressure. Until you open the bottle and pour a glass of soda, the gas mostly stays suspended in the liquid and cannot expand to form more bubbles, which gases naturally do.
But there's more... If you shake the bottle and then open it, the gas is released from the protective hold of the water molecules and escapes with a whoosh, taking some of the soda along with it. What other ways can you cause the gas to escape? Just drop something into a glass of soda and notice how bubbles immediately form on the surface of the object. For example, adding salt to soda causes it to foam up because thousands of little bubbles form on the surface of each grain of salt. Many scientists, including Lee Marek, claim that the Mentos phenomenon is a physical reaction, not a chemical one.
Water molecules strongly attract each other, linking together to form a tight mesh around each bubble of carbon dioxide gas in the soda. In order to form a new bubble, or even to expand a bubble that has already formed, water molecules must push away from each other. It takes extra energy to break this "surface tension." In other words, water "resists" the expansion of bubbles in the soda.
When you drop the Mentos into the soda, the gelatin and gum Arabic from the dissolving candy break the surface tension. This disrupts the water mesh, so that it takes less work to expand and form new bubbles. Each Mentos candy has thousands of tiny pits all over the surface. These tiny pits are called nucleation sites - perfect places for carbon dioxide bubbles to form.
As soon as the Mentos hit the soda, bubbles form all over the surface of the candy. Couple this with the fact that the Mentos candies are heavy and sink to the bottom of the bottle and you've got a double-whammy. When all this gas is released, it literally pushes all of the liquid up and out of the bottle in an incredible soda blast. You can see a similar effect when potatoes or pasta are lowered into a pot of boiling water. The water will sometimes boil over because organic materials that leach out of the cooking potatoes or pasta disrupt the tight mesh of water molecules at the surface of the water, making it easier for bubbles and foam to frm. When a scoop of ice cream is added to root beer, the float foams over for essentially the same reason. The surface tension of the root beer is lowered by gums and proteins from the melting ice cream, and the CO2 bubbles expand and release easily, creating a beautiful foam on top.
Go to the main THEMES PAGE for more theme ideas!
Go to Preschool Plan It's Home Page


Hey there! Welcome to Preschool Plan It! I’m Cheryl, a preschool teacher of over 20 years.
I KNOW, I know, you spend hours of time developing your preschool themes, activities and preschool lesson plans each week. You are commited to planning preschool themes and activities that are engaging hands-on, interactive, fun AND meet the goal of supporting each child’s level of growth and development.
I am commited to providing you, the preschool teacher, with everything you need to develop preschool lesson plans and preschool activities for your classroom all in one place!
READ MORE
Join My Free Preschool Teacher Tips Newsletter
You’ll receive a weekly email with planning tips and teaching ideas.
You'll also receive (on the 1st of each month) a free theme starter pack with some printables and activity ideas to get you started planning a theme!Join Now and Get Your First Theme Right Away!
© Copyright 2010-2025 Preschool-Plan-It.com | All Rights Reserved | Privacy Policy & Disclaimer
- Preschool Teachers
